Friday, July 4, 2014

Paper Pumpkins

Here are some cute little paper pumpkins that I made...I sent them off to family members so they could use them for Halloween and Thanksgiving. There are two different kinds. For the first kind, you cut strips of paper, and punch holes in the ends. Then you use brads to hold them together, and spread the strips out. There is a great tutorial on a blog called Scrapedia with really clear pictures. I chose to add other things to the top, but they have a cute idea for a stem. Click HERE to see the blog. The occupational therapist and I actually did this project with kids at work! For the speech aspect, we had them read and follow directions, and then explain to someone else what to do. Obviously, for the OT aspect, they had to cut, hole-punch, hold the brads on, etc.

The other kind I used circle cuts, folded them in half, and hot glued the sides to each other. When you finally spread them around to glue the final sides together and make the full circle, it leaves a small space down the middle. I had some lollipop sticks on hand, so I used hot glue and stuck those down the center. If they are a little off-kilter when you try to stand them up, try cutting a small circle and glueing it to the bottom to stabilize it. I used the Cricut to cut the leaves, and distress inks on the edges of everything! I love distress-y, vintage stuff for the fall.


Barbecue Decorations

We had a BBQ for my husband's birthday, and I wanted to make some decorations...but he didn't want a theme (I know, what a party pooper, right? Boys are lame...) Soooo...the theme was...BBQ! There is a cricut cartridge called "Block Party", and the digital version happened to be on sale! Perfecto. The lemonade, burgers, hot dogs and condiments are all from that cartridge! I made a banner with them, and actually hung rectangles of postboard that were painted with chalkboard paint, and backed with burlap, and said Happy Birthday. The pictures of that part see. To have disappeared though! The decorations are simple, but definitely came out cute! Enjoy your summer BBQs everyone.


Birthday Cards

Just a couple of quick birthday cards today...The pictures look more blurry on here than when I took them on my phone! But the cards are long gone, so this is the best I can do!

I just got this cupcake punch from Stampin' Up! It is really cute so I just used a variety of bright papers to pop against the black cardstock. Cute, and only took me about 15 minutes! Can't beat that.


This one was for my sister's birthday. She and her boyfriend work so hard all the time...She works two jobs, 6-7 days a week, and they finally decided to take a vacation for the first time in forever! They were going on a cruise, and I wanted a fun way to give her some money towards their adventures. I saw other people on Pinterest ripping blue paper to look like waves, and it is definitely a cute detail! The inside is actually a pocket where we put the moolah.


Catch ya later!

More Pop-out Crib Cards

I posted some pop-out crib cards on one of my first posts. They are always such a hit! I've got a few more to share...Like usual, I always try to use the theme or color schemes that people have on their registry. It makes it so personal and it actually makes it easier to have a theme to start with. Here you go!


Quilled 3D Flowers

I was lucky enough to have a crafty mom who inspired me to start doing projects when I was very young. She was able to be a stay at home mom with my sister and I for quite a while, and she is extremely talented with any kind of sewing, building, crafting, you name it! I never even knew for the longest time that she and her sister knew how to do paper quilling! They all have framed copies of their wedding invitations with beautiful quilled flowers in coordinating colors, but it never occurred to me to ask who made them! It turns out, they did! My aunt made a gorgeous one for me as a wedding gift, to follow in the tradition.
So anyway, one of the recent times that I was on the east coast for a visit, my mom bought a quilling set so we could play around with it. I was totally hooked, and started looking on Pinterest and YouTube. If you have never looked at some of the incredible quilled creations that are out there, check it out! It is absolutely mind-blowing what some people do! I mean, I was all excited about the cute little duck I made, and then I find people that have made entire 3D camping scenes or dollhouse food from quilling. So one of my favorites that I found was a woman on YouTube who had made some GORGEOUS 3D flower pots, and put them in a display case. Her YouTube name is Yoyomax, and she has some super cool tutorials. Click HERE to see one of her tutorials.
I found one of the Tim Holtz boxes that has little compartments on sale for about 6 dollars at JoAnn, and I also went to the dollhouse section and found some little wooden chairs and some mini birds. I distressed some papers and put them against the back of the compartments, and then put different pots of flowers in each compartment. I gave this as a gift to my husband's grandmother for Christmas. She is so lovely, and a very talented crafter herself! I probably could have embellished the box much more, but, big surprise, I was finishing this at the last minute. Enjoy!


Mad Hatter


Hi there! So I already put up a post where I used the 3-D hat from the "Independence Day 3D" cricut digital cartridge to make "frosty the snowman" hats. This time I used it to make Mad Hatter hats for a cousin's Alice in Wonderland birthday! I loooove how these came out! I picked darker colors for the hat, and used black distress ink on all of the edges. I used what I thought were mad hatter-y patterned papers for the band around the middle, and then I just used rectangles of cream colored paper to make the size tag that he has stuck in the band. I used the "tea dye" distress ink color on those.


I made the teacups using the "cupcake wrapper" cartridge. This was a little fussy (and I discovered later that there is a cartridge that actually HAS a 3D teacup...but I hate buying a whole cartridge for just one image! I now have a Cricut Explore and can buy individual images, which has completely rocked my crafting world. But I digress...). What I did was cut a solid cupcake wrapper, then cut a plain circle for the base, and then cut a random letter C for the handle. It was reeeeally crazy to get them to stand up! I am sure there is a much better way to stack and put them together, but I was doing this a little bit at the last minute. I rolled tubes of paper with punched circles and the top and base, so it made a little support column. I used massive amounts of hot glue, and then I put a whole bunch of marbles (the vase-filler kind) in the bottom and used tons of glue and marbles to make the topsy-turvy weight even out on the second and third tiers. I covered all of the marbles with bright colored basket fluff. There were a few times I thought they were going to fall apart, and they were probably too flimsy for anything more than a one-time use. But they worked!


Quick Animal Birthday Cards

I've been trying to get better about keeping a stock of pre-made cards lying around, so I'm not constantly trying to wait for the glue to dry in the car ride to a birthday party lol :) Just kidding, I'm not THAT bad...usually...Anyway, I still maintain that the create-a-critter cartridges are my favorites that I've ever bought! I use them for all kinds of holidays. These are some pre-made cards that I threw together...no sentiments on them yet, until they have a recipient in mind. But they are perfect pre-made ideas to have on hand! The animals are from the create-a-critter cartridges, and the balloons are just a punch that I have! Easy peasy. Drew the strings with a black pen. Voila!


Rolled Paper

Hello crafty peeps...I tried a new style of cards this week. I completely owe the inspiration to a video I saw on YouTube. Click HERE for the tutorial. Her name is Luisa Diaz, and she has some STUNNING tutorials! She has tons of embellishments on hers, and gorgeous distressing and inking. I confess, I am a little more of a minimalist with my style, but I tried to use more distressing, at least on the edges of these. She actually tucked a tag into the rolled down part of hers, which is so cool! I decided to just leave mine. I haven't put a sentiment on the blue one yet, because I don't have a recipient in mind at the moment. I did the rolling part exactly as she did on her video, so use her for your inspiration! Very talented. I was very happy with how mine came out. I used papers from some smaller 6x6 packs that had double sided paper. I should also mention that I bought the paper packs at our local Tuesday Morning...I went in there for the first time and was shocked to see a whole scrapbooking/crafting aisle! I was so excited! I am talking about real stuff too, like 7 Gypsies brand, great paper packs, washi tapes, ribbons, etc! Very cool.
Have a lovely day :)


Christmas...in July...

So I realize that it is July, and not quite the time to be thinking about Christmas! But I am cleaning some things out of my camera, and realized I never shared these! These were two fun decorations I made at Christmas time.

The "Frosty the Snowman" hats were actually from the Cricut cartridge called Independence Day 3D projects (see? kind of appropriate for this weekend...) I just cut them in black, and did not use the stripe layers or the layer that had the stars. I used ribbon, and actual little clippings off our Christmas tree to stick in the ribbon! I used really chunky glitter to look like snow. There are all kinds of fun things you could do with this! You could distress ribbons and add vintage elements...I left these at my mom's house in CT, but I make make some for our house in AZ this year!


The "Mrs. Claus" shoes are from the Princess Party cartridge. These were really fun to embellish, and I actually used these same ones to do witch shoes with green oreos at Halloween! I've got to try and find those pictures....Anyway, again, there are tons of different things you could do with these. They are great little gift items too. I know that sometimes in the workplace or around neighborhoods people do a holiday "jingle" or gift exchange, and it is a great cost-effective gift that is still really fun to receive.


Enjoy the 4th of July while you look at my Christmas pictures :)


Baptism Decorations

It has been a while since I posted anything! The end of the school year was totally insane and horrible, so I didn't do a whole lot of creative projects. One of my favorites that I haven't shared yet is decorating for our little godson's Christening. He is cute as a button, and my sister in law decided that she was going to do white and silver/gray for the decorations. I made the table centerpieces and a banner. I also decorated a plain candle to use as the one that they light. It was a really fun day, and my hubs and I were really honored to be the godparents!

The candle wasn't quite as nice as I had hoped. I re-did it about three times, and didn't love the font with his name (which I am not sharing for confidentiality!), it was fun to have a unique candle for the lighting ceremony.


The crosses were really thick chipboard that came from Hobby Lobby. I painted them white, and then used a few of the Cricut "new testament" crosses as the silver and white layers. I actually bought a couple of them as separate cuts; I didn't buy the whole cartridge. I also used those as some confetti! I cut them really small and just filled the page, and set it to cut while I worked on other things. I was really pleased with these!!


The banner was just different sized circles with white and gray and silver papers layered together. I popped each layer out with dimensional foam or just layering hot glue. The centers were either clear gems, or cross stickers from JoAnn.


Minions & Lalaloopsy

Last year for my niece and nephew's birthday, we did the smurf theme. I did a post about the decorations, which I shared in another post. This year, my sister-in-law decided to do two separate themes, just half and half with the decorations. My nephew loves minions, and my niece loves Lalaloopsy. Now Cricut does not have cartridges for either of those, BUT the minions were pretty easy to do, using basic shapes. Using Cricut craft room, I welded a circle to the top of a long rectangle, to get the perfect body shape. I cut out silver circles and put googly eyes in the middle, and cut little black strips for the goggles. The mouths were from the "funny faces" cartridge, but could easily be drawn on in black marker.


The Lalaloopsy characters were made from the "Playtime" cartridge, and they took a lot more finagling. I layered some of the things like the hair and welded together pieces of the outfits, only because I wanted the outfits to look exactly like specific characters. If your little one really won't notice the difference, then it doesn't matter if you just use whatever colors or outfits you want. My niece has her favorite characters, like the one in the striped pajamas, so I wanted her to recognize them right away. Anyway the sticks in the middle are just dowel rods wrapped up in yarn, and I bought a value pack of pastel colored buttons from JoAnn to stick around randomly. My niece even stuck a bunch of buttons around the tables outside. 

Even though Cricut doesn't have licensed character cartridges for a lot of the popular movies or shows, don't be afraid to play around with what they DO have! I bet you'll come up with fun ideas! 


Monday, January 13, 2014

Lindy's Stamp Gang January Color Challenge

Hello blogging world....I haven't written a post in over 8 months!! Yikes!! You know how life just gets going at certain times...I have some new posts coming up, but I decided that a fun way to get back into things would be to join a color challenge from Lindy's Stamp Gang. If you have never looked at any of their projects, you have GOT to check them out! Especially if you love shimmer and glitz. They have a huge variety of color sprays, paints, and embossing powders that match! ALMOST everything has shimmer to it, except their line called "Flat Fabios". Anyway, search for YouTube videos also, there are tons of product demos!
I have currently overindulged in their line of pigment powders called "magical micas". They are little pots of powder that resemble some of the other ones out there like the Perfect Pearls, but the difference is that they contain a layer of pigment along with the shimmery dust. So that means depending on the amount of water, paste, etc. that you add to it, you may get more of a concentrated shimmer, or a more vibrant pigment. Anyway, I will let you do the research on that for yourself. The point is, I now have a billion pots of magical micas in my craft room.

So every month Lindy's Stamp Gang does a color challenge. They post an inspiration photo, and a list of their products with the color palette that matches. You can use all the colors, but you must use at least two. This was the color challenge picture this month:


Let me preface this by saying that I have never done a mixed media project before! I am usually a papercrafty type of gal, but I decided to leave my comfort (and talent) zone for this one. The projects featured in their color challenge blog are usually full of work from incredibly talented mixed media artists, so I decided to try it out just for the heck of it. 
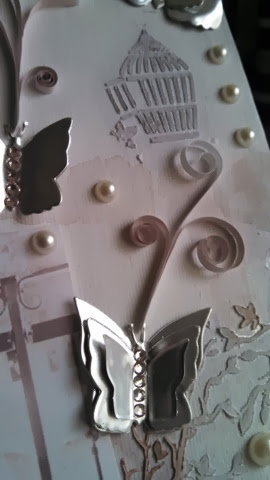
I chose to use only two colors: the gray and the pink. I used the magical micas in "Gag Me With A Spoon Gray" and "Bodacious Blush" (they are from an 80's set...don't the names make you giggle?). I started with a small canvas from JoAnn, and brushed some gesso in random places, to see how the micas would absorb differently into primed or plain canvas. 
Then I used some stencils and modeling paste to add raised designs...I liked the birdcage a lot, and left it sort of as a focal point. After it dried  overnight, I used a little palette and a waterbrush to mix up the magicals with some water. I wish I had documented my process a little here, but I did not. Maybe I will do a post about the micas some other time. 
I was initially unhappy with the results, because the inspiration picture had such pretty, light colors, and these particular gray and pink powders created reeeeeally dark colors, no matter how much i watered them down. I actually ruined some other paper flowers that I was going to use, and changed my vision for the project quite a bit. I finally painted the whole thing with color, and then used a squirt bottle to literally wash the whole thing out. I squirted the water directly onto the canvas, letting it run all over it, until I got the lighter colors that I had pictured. 
I have been playing with dies and metal sheets lately, so I used sizzix butterfly dies and rose creation dies to make metal butterflies and flowers. 
I then took a picture of my adorable niece from when she was a flower girl at our wedding this past year. I didn't want to use her face, because I am plastering this all over the internet! But I just love this shot. I played with the tones and saturation on the computer until I got the colors that matched really well. 
I also incorporated some strips of quilling paper. They were white to begin with, and I brushed them with the magical mica powders as well, so they would match. 

So I like the final product, although I clearly need more practice with mixed media art! I think for the next challenge I will stick to some kind of papercrafting. But it was fun to try this time! Happy new year everyone.